
If you are a WordPress.com user then you are probably missing the fun of installing plugins and customizing themes, monetizing your website and get full control over it. If this is the case, then you have got move your WordPress.com blog to a self-hosted WordPress.org site.
Go through the following article and you will be able to transfer all your WordPress.com content to a WordPress.org site while keeping your search engine rankings and your users.
Transferring Your Blog Data To WordPress.com From WordPress.org
Before We Start
Before starting you have got to have a domain name and a hosting company that knows WordPress (for example, Bluehost).
You don’t need a new domain if your WordPress site already has one.
To move all your images, post, comments and other data you need access to your WordPress.com account.
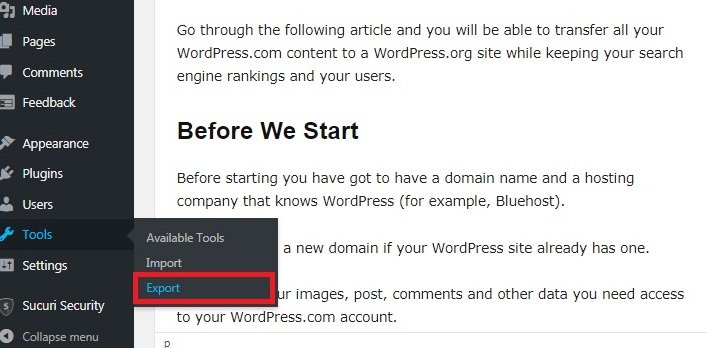
#1: Exporting Data from WordPress.com
First, you need to sign in to your WordPress.com account, then go to the Dashboard and then click on Export under Tools menu.
Click on the Export tool. Now a new page will open asking you to choose between Free and Guided Transfer.
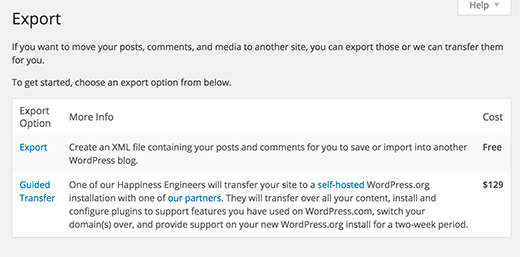
Now what you need to do is to click on Export and select the Free option.
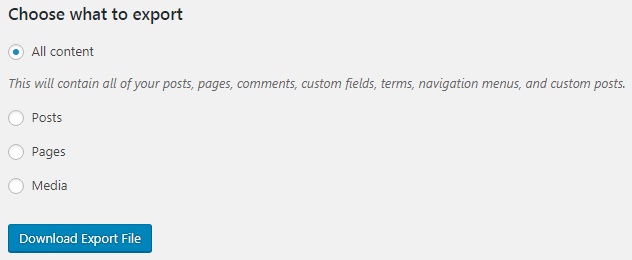
The next screen will appear asking you the data that you need to export. Click on “All Content” and then press the Download Export File button. Next, an XML file will start downloading. This XML file contains all of your posts, pages, image, and all other information.
#2: Setting up WordPress
Now you need to set up a fresh WordPress install on your web hosting.
Now you need to import your content into your self-hosted WordPress site.
#3: Importing Content
In your self-hosted WordPress.org Dashboard, click on Tools and then import option.
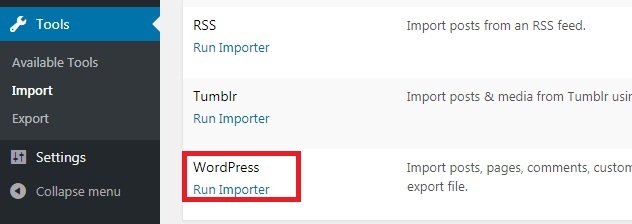
You will be asked to install WordPress Importer once you click on WordPress in this menu. Install and Activate it.
A new screen will open asking you to upload the XML file that you have already downloaded
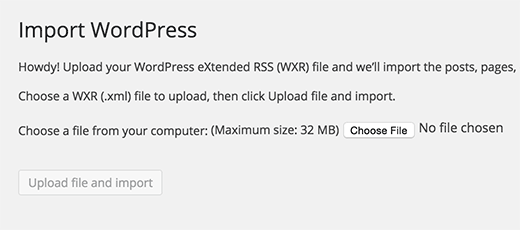
There may be some issue uploading the XML file in case it is larger than 2MB. This leaves you with two options. You can either use WXR file splitter to split your file or you can contact your web hosting company and ask them to increase that limit temporarily.
#4: Importing your Blogroll Links
In case you used the Links feature on your WordPress.com blog then follow these instructions or you can skip to #5.
OPML is the format in which Blogroll links are exported. This is an XML format that allows you to export and import your links and link categories.
At an address like that following, your WordPress.com links have an OPML file:
http://example.wordpress.com/wp-links-opml.php
Or in case you are using a custom WordPress blog then you need to visit:
http://www.example.com/wp-links-opml.php
Now you will see your OPML file on your browser window. Save it by pressing CTRL+S or Command+S on Mac.
Now you need to install and activate the Link Manager plugin. A new menu item labeled ‘Links’ will be added after activation

Now you are ready to import your links. All you need to do is got to Tools and then Import and click on Blogroll to install the OPML importer.
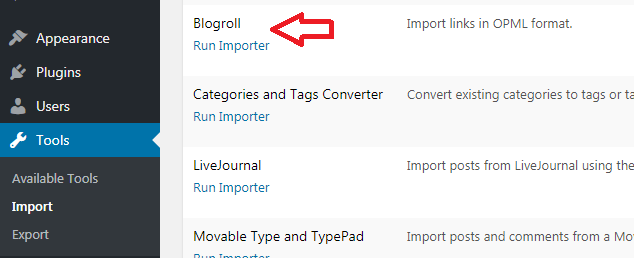
Once you are redirected to the importer after installation, upload the OPML file that you have already saved. Then click on import OPML file.

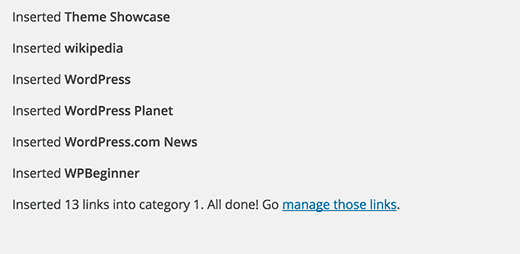
Now WordPress will start importing your links and link categories from OPML file. You will receive a message on completion.
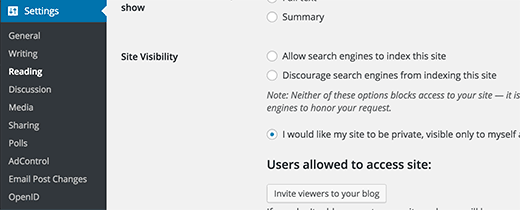
#5: Setting your WordPress blog to private
In case you don’t want to redirect your old users to your new site you will have to set your WordPress blog to private.
On your WordPress.com Dashboard, go to Settings tab and then Reading the page and then select “I would like my blog to be private, visible only to users I choose”.
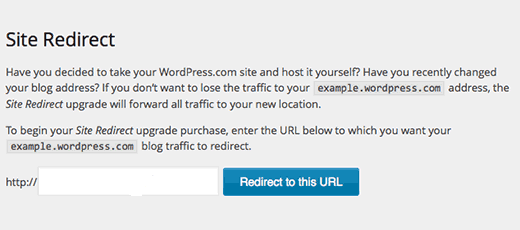
#6: Redirecting Visitors and Preserving SEO
To keep search rankings while moving a site from one location to another, the standard solution is to redirect users to the new location with 301 headers. You won’t be able to make any changes by yourself to retain your search engine rankings because you don’t have access to .htaccess on WordPress. There is an option of paid upgrade which will provide you with this function.
Search for Site redirect in your WordPress.com blog’s Store. This will provide 301 redirects. This will automatically redirect you to your new site.
That is all. We hope our article helped you 🙂