
The WordPress Newsletter plugin is a flexible bulletin plugin which can be easily installed and incorporates well with your WordPress site. Utilizing the WordPress Newsletter module is easy and will enhance your business’ potentials and definitely increase your followers.
Installing The Newsletter Plugin in wordPress Website or Blog – The First Steps

Let’s hover over the installation, requirements and how to get started with the Newsletter plugin.
Framework Requirements
- WordPress 4.0 or higher
- Linux/Apache (or Windows/IIS) Server (suggested)
- MySQL 4 or higher
- sql_mode Off or TRADITIONAL
- HP 5.4 or higher
- memory_limit 64M (96M suggested)
- safe_mode Off
- Mail Server (Local/Remote)
- Theme Requirements
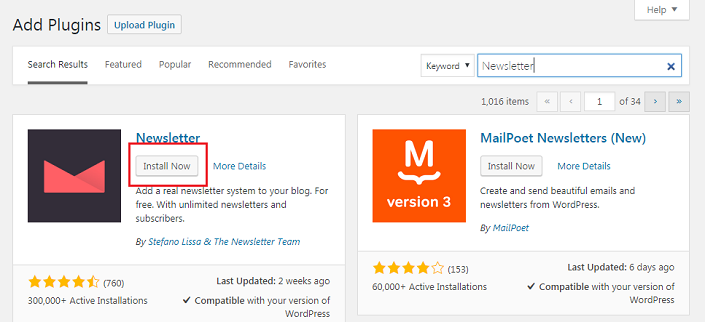
Installing the Plugin
- Download the ZIP bundle from downloads management module.
- Unzip the bundle to acquire the wp-mailing list envelope of the module.
- Upload the wp-mailing list organizer to the wp-content/plugin/registry.
- Log in to your WordPress administrator and go to the “Plugins” page in your dashboard.
- Activate the “Newsletter” plugin by tapping the “Activate” interface.
- To begin using the Plugin, tap on the “Newsletter” menu icon on your dashboard.
Updating the Plugin
You should update your wordPress plugin at regular intervals in order to avoid troubles in it. Every single piece of your settings, items and other information will stay in place and nothing will be lost.
We suggest that you deactivate the plugin before transferring the documents and after that re-activating the module again after you have transferred the new records to forestall mistakes on a creation site.
Up To A start
-
Installation
- Go to ‘Plugins’ in your WordPress dashboard.
- Go to Newsletters and tap the ‘Activate’ link.
- You will now observe a red bar over the top of your administrator screen.
*Please take note of: The serial key is exceptionally delicate to the area it is produced for. There are extremely elucidating guidelines however essentially, from your WordPress administrator page, the URL appeared in the address bar of your program, you have to choose everything after the “HTTP://” and before the following “/” cut.
Case: https://www.hardisha.com/subfolder1/subfolder2 for this URL you would just choose the www.hardisha.com
Any mistake in the entry of key may result in blocking of the key. In that case, one needs to get in touch with the support team. In the event that your serial key was produced for the wrong domain, this is the place you will get an “Invalid Serial Key” message if it is correct; at that point, you can continue and start utilizing the module.
-
Configuring The Newsletter Plugin
- The menu thing ‘Newsletter’ will show up in your menu. Go to ‘Newsletter’ > ‘Configuration’.
- Click on Auto-import clients from WordPress in the event that you need to import your present clients into a rundown.
- Read deliberately through the Configuration and select the alternatives that best suit what you need.
- If you have in excess of 100 endorsers, make sure to turn On the email booking highlight. Keep the interim as low as would be prudent and endeavor to keep the number of messages per interim underneath 100.
- Click on the blue ‘Save Settings’ at the highest point of the page when you are finished.
-
Put a Subscribe Form on the Site
You would doubtlessly need to put a buy in the frame on the site with the goal that your clients can subscribe into your mailing list(s) on the client end of the site by filling in their email address (and other conceivable subtle elements).
There are a few methods for putting a buy-in frame on your WordPress site. You can utilize different occasions (numerous buy in shapes) all through the site and it isn’t constrained to only a solitary one. They include:
- Using a sidebar gadget under ‘Appearance’ > ‘Gadgets’.
- Embedding into a WordPress post/page with a shortcode.
- Hardcoding into the subject with PHP code.
Read the membership frame documentation for point by point guidelines on the best way to utilize every individual strategy.
-
Getting Data from Subscribers
- Go to ‘Newsletter’ > ‘Custom Fields’ and tap the ‘Add New’ button.
- Enter the title, for example, “Name”.
- Click ‘Required’, fill in Error Message, for example, “Please fill in your name”.
- Select the field write. i.e. ‘content field’ in the drop down.
- Tick/check the rundowns with which you need to relate the custom field.
- Click Save Custom Field.
-
Send a Post as a Newsletter
You can read the documentation on Send Post/Page as Newsletter for more data.
- Go to ‘Posts’ > ‘Include New’ in your dashboard to include another WordPress post or basically alter a current one which you need to convey as a newsletter.
- Below the WYSIWYG editor, tick/check the particular mailing list(s) to which you need to convey the post as a newsletter.
Newsletter and Email subscribers plugin is the best plugin in WordPress to get more subscribers and to increase the visibility of your website.